How to Change Netgear Orbi Account 2FA Phone Number?
We’ve received a lot of queries regarding Netgear Orbi account 2-factor authentication phone number update. Most users find it difficult to change the verification phone number for Orbi account login. It seems that they do not know where to update the phone number. Keeping into account such users, we have jotted down this blog post that will help you update the phone number in an easy manner.
What is Orbi 2 Factor Authentication?
A Netgear Orbi user can enable 2-Factor authentication while logging in to Netgear Orbi system. This is an added layer of security wherein the user needs to enter a unique code that’s received on the contact number or email ID every time he/she tries to log in. Let’s make it more clear for you. Every time you try to do the Orbi admin login, you enter a username and password. The password is used to secure your network and account. To add an extra layer of security, go for 2 FA.
2 FA or 2 Factor Authentication can be opted out for while you are creating the Netgear Orbi account for the first time. You can also enable it after logging in later. If you select this, then every time you try to log in, you’ll receive a code on your phone number that you specified during account creation. This code needs to be entered while logging in.
How to Change Netgear Orbi Account 2FA Phone Number?
Now, there’s a possibility that you have changed your contact number and you wish to update it in the Netgear Orbi account. But you have no idea where to update it. Recently a user reported a similar concern. He had no idea how to update his phone number. We helped him. Let us tell you how.
Case 1: You Have Access to Previous Phone Number
If you’ve access to the previous phone number, then it becomes very easy for you to update the phone number by logging in. However, if you don‘t have access to this number then there’s something else that you need to do. That we have discussed in the next section.
For now, see what you should do to update your phone number using the previous contact number.
- Connect your phone to your Netgear Orbi’s WiFi first.
- Now, run the Orbi app.
- Log in to the app.
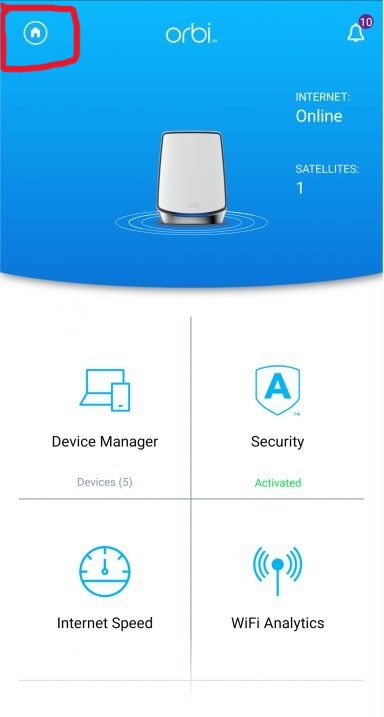
- Tap on Home or Cloud on the top-left corner of the dashboard.
- Next, tap on Account Management > Login Settings > Two-step Verification > My Trusted Devices.
- Find your device that you want to remove. You will first remove the device and then add a new number.
- Tap on Remove device option.
The phone number is deleted from the Netgear Orbi account. Now, go ahead and add the new device with new phone number. We have also discussed the steps for the same in the upcoming sections.
Case 2: You Do Not Have Access to Previous Phone Number
If you do not have access to the previous contact number then you won’t be able to log in to your app using Orbi router login details. In that case, you need to choose the option to receive code on email account or any other device that you have set up. Get the code via email and do the login on the Orbi app and follow the same steps as given in Case 1.
How to Add 2 FA to Netgear Orbi Account?
- Launch Netgear Orbi on a phone that’s connected to Orbi’s WiFi.
- Use the same phone that you want to add to the account.
- In the dashboard that displays, tap on Home or Cloud icon.

- Select Account Management and select Login Settings.
- Now, select Two-Step Verification and select Enable.
- Select SMS or Push Notifications.
- Type the phone number that you want to add to receive codes.
- Tap on Continue.
- You’ll receive a 6-digit verification code on the same phone number and select Continue.
- If you want this device to be your primary verification device, then select Approve.
- Finally, tap Continue to save the settings changed by you.
Let’s Wrap it Up
This blog post helped you learn how to remove a device from 2-factor authentication on Netgear Orbi account. You’ve also gained information on how to add a new device. With the hope of providing you with the required information, here we wrap up our post.